Editor & Inspector Reference
Note: See bottom of page for Tutorials & Reference.
If you already own LightShape, be sure to register by sending an email to cscherubini@gmail.com to receive update information.
The LightShape Window
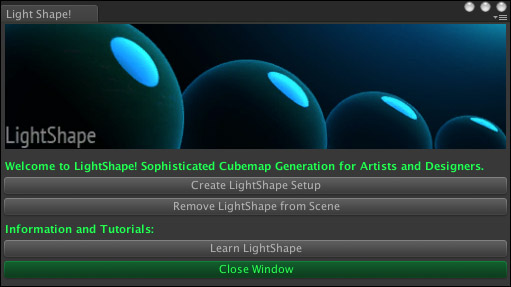
1. Create LightShape Setup: Button
Button will add an LSManager and an LSPrope ,as its child, with default setting.
2. Remove LightShape from Scene: Button
Will remove the LSManager and any LSProbes that are in the scene. it will not delete anything from the Project Directories.
3. Learn LightShape: Button
Will open a web browser to the online information site.
4. Close Window: Button
Will close the LightShape Window.
The LSManager Inspector
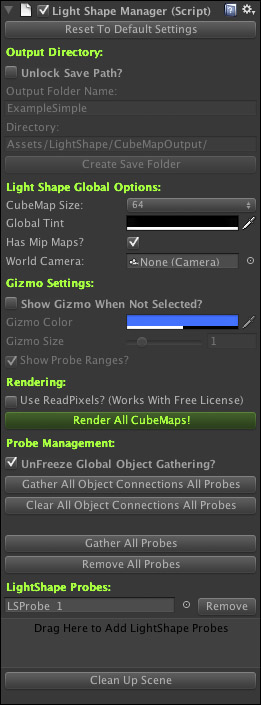
1. Unlock Save Path: Toggle
This is here to ensure accidental folder naming does not happen. Uncheck to create new save paths.
2. Output Folder Name: String
This is the name of the Output Folder where Cubemaps will be saves after generation.
3. Directory: String
This is the file path to the Output Folder.
4. Create Save Folder: Button
Creates Output Path, Folder, and turns on the Unlock Save Path toggle.
5. Cubemap Size: Dropdown
This is how big the Cubemaps are in Pixels.
6. Global Tint: Color
Use this to Tint Every Probe’s Cubemap to a color in the Managers Probe list.
7. Has Mips: Toggle
This will toggle Mip Map generation for all Cubemaps. Mip Maps are used my the LightShape Shaders for blurry reflection levels.
8. World Camera(Optional): Object Field > Camera
This is the Camera used for the Background Color on Probes.
9. Show Gizmo When Not Selected?: Toggle
Scene Gizmos for LSProbes will be visible without the LSMaganer or LSProbe selected if ON.
10. Gizmo Color: Color
Color of the LSProbe Scene Gizmo.
11. Gizmo Size: Slider
Size of the LSProbe Scene Gizmo.
12. Show Probe Ranges: Toggle
This Toggles Visibility of the Radius of LSProbe Scene Gizmos.
13. Use Read Pixels(Works With Free License): Toggle
On will use the Read Pixels Method that works with the Free Version of Unity. Off will use Render Texture Method.
14. Render All Cubemaps: Button
Click this to Render All LSProbe’s Cubemaps.
15. Unfreeze Global Object Gathering?: Toggle
Toggles the lockout of ALL LSProbe Object Gathering.
16. Gather All Object Connections All Probes: Button
Will Gather Objects into LSProbe object lists that are inside of an LSProbe Radius. Objects will not be in more than one LSProbe list.(magic!)
17. Clear All Object Connections All Probes: Button
Will Clear all LSProbe object lists.
18. Gather All Probes: Button
Finds all LSProbes in the scene and assigns them to the LSManager probe list.
19. Clear All Probes: Button
Clears the LSManager’s probe list.
20. LightShape Probes: Object Field
List of all assigned LSProbes.
21. Drag Objects Here: Drag & Drop Field
Manual assignment to the probe list.
22. Clean Up Scene: Button
In the event of an Error, objects may be in the scene. Use this to Remove all Objects that were generated during the Render that Erred.
The Default LSProbe Inspector
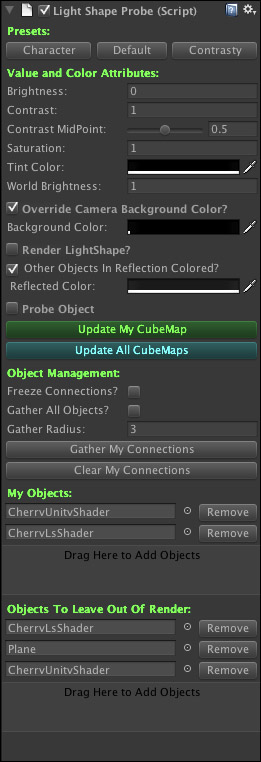
1. Presets: Three Buttons
Character, Default, & Contrasty presets to start from.
2. Brightness: Float
Brightness of the Cubemap.
3. Contrast: Float
Contrast of the Cubemap image.
4. Contrast Midpoint: Slider
Midpoint used for Contrast. Pixels above this value will be made brighter. Values below this will be made darker.
5. Saturation: Float
Color Saturation of the Cubemap image. Note: Ground Shape is not effected.
6. Tint Color: Color
Color Tint of the Cubemap image.
7. World Brightness: Float
Brightness of the World contribution into the Cubemap Image.
8. Override Camera Background Color?: Toggle
Use this to Override the LSManager’s World Camera Background Color. If you have a Skybox assigned in the Render Settings leave this Off to render the Skybox into the Cubemap. If you have a Skybox and this is ON, the Override Color will be used.
9. Background Color: Color
The Color used when Override Camera Background Color? is ON.
10. Render LightShape?: Toggle
Enables and Expands the LightShape Rendering.
11. Other Objects In Reflection Colored?: Toggle
Put a Solid Colored Cubemap on the objects in the world that use Cubemaps. OFF will render a second pass for all LSProbe‘s that have this OFF. the result is that reflections will appear on objects in the Cubemap Image.
12. Reflected Color: Color
The color of the Solid Colored Cubemap used.
13. Probe Object: Toggle
Expands the Positioning, Preview (Pro Only), & Set CubeMaps Per Object?(In Game): toggles.
14. Update My Cubemap: Button
Render the Cubemap for this LSProbe.
15. Update All Cubemaps: Button
Render all LSProbe Cubemaps. Same as the Render All Cubemaps button found in the LSManager.
16. Freeze Connections?: Toggle
Keeps object assignment from Changing during any Global Object Gathering.
17. Gather All Objects?: Toggle
This LSProbe will gather ALL scene objects into it’s object list.
18. Gather Radius: Float
The size of the LSProbe’s Sphere of Influence.
20. Gather My Connections: Button
Gather all Scene objects that are inside of the LSProbe’s Sphere of Influence. Objects already assigned to another LSProbe will not be Gathered.
21. Clear My Connections: Button
Clear this LSProbe’s object list.
22. My Objects: Object Field
A List of the objects Gathered and assigned to this LSProbe.
23. Drag Here to Add Objects: Drag & Drop Field
Manual Assigning to the LSProbe object list. Objects with no Cubemap Shader can be assigned but they will not be effected. A Mesh Renderer is Required.
24. Objects to Leave Out Of Render: Object Field
Objects in this list are NOT rendered into this LSProbe’s Cubemap image.
25. Drag Here to Add Objects: Drag & Drop Field
Manual Assigning to the LSProbe Do Not Render list. A Mesh Renderer is Required.
The Render LightShape part of the LSProbe Inspector
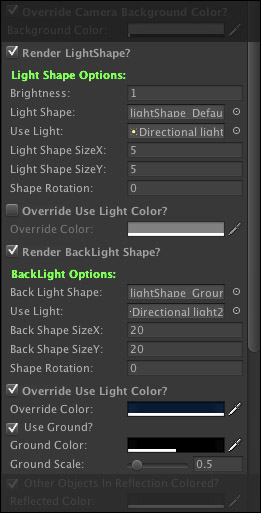
1. Brightness: Float
Brightness of the LightShape Pass.
2. Light Shape: Object Field > GameObject
The Art Prefab used for the First Lightshape Pass. Included LightShape Prefabs can be found in Assets/LightShape/Light_Shapes
3. Use Light (Required): Object Field > Light
Light to use as Position and Color for the First LightShape pass.
4. Light Shape Size X: Float
Size of the First LightShape in X.
5. Light Shape Size Y: Float
Size of the First LightShape in Y.
6. Shape Rotation: Float
Rotation of the First LightShape image.
7. Override Light Color?: Toggle
Use a Custom Color instead of the color of the First Use Light.
8. Override Color: Color
The Color used if the First Override Use Light is ON.
9. Render BackLight Shape?: Toggle
Enable and Expand the Second LightShape Rendering.
10. Back Light Shape: Object Field > GameObject
The Art Prefab used for the Second Lightshape Pass. Included LightShape Prefabs can be found in Assets/LightShape/Light_Shapes
11. use Light (Optional): Object Field > Light
Light to use as Position and Color for the Second LightShape pass.
12. Light Shape Size X: Float
Size of the Second LightShape in X.
13. Light Shape Size Y: Float
Size of the Second LightShape in Y.
14. Shape Rotation: Float
Rotation of the Second LightShape image.
15. Override Light Color?: Toggle
Use a Custom Color instead of the color of the Second Use Light.
16. Override Color: Color
The Color used if the Second Override Use Light is ON.
17. Use Ground?: Toggle
Turn on Coloring for the Bottom Part of the LSProbe Cubemap.
18. Ground Color: Color
The Color Used for the Ground LightShape.
19. Ground Scale: Float
The Size of the Ground LightShape.
The Probe Object part of the LSProbe Inspector
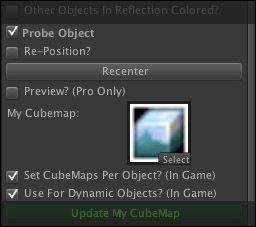
1. Re-Position: Toggle
Used to move the Rendering Position Without moving the LSProbe object.
2. Recenter: Button
Recenter the Rendering Position to the LSProbe center.
3. Preview? (Pro Only): Toggle
Enable a Real-Time Preview of the LSProbe Rendering Position.
4. My Cubemap: Cubemap
The Cubemap Associated with this LSProbe.
5. Set CubeMaps Per Object?(In Game): Toggle
Used to Assign the LSProbe Cubemap to each Object in the LSProbe object list When the Game is Run. The alternative is to create a unique material for every object that uses a different Cubemap…Yuck!
6. Use For Dynamic Objects? (In Game): Toggle
Used to Apply this probe’s Cubemap to Dynamic Objects with a Ridgid Body, Trigger Collider, & a Shader that HasProperty(“_Cube”) during Game Run.
*This is a very simple Implementation using OnTriggerEnter(Collider Collided). You will Most Likely want to implement your own method that is appropriate for your project. This Method was appropriate for my Project.
Other Info:
